How to Light a Bathroom: The Ultimate NZ Guide (2025)
Create a bright, functional and stylish bathroom with the right lighting plan.
Lighting is one of the most important — and most overlooked — parts of bathroom design. The right lighting can make your bathroom look larger, feel more luxurious, improve functionality, and even increase the value of your home.
But because bathrooms are wet areas with strict electrical and building code requirements in NZ, choosing the right lighting takes more than picking a nice-looking fixture.
This guide covers everything you need to know about how to light a bathroom in New Zealand, including placement, types of lighting, safety zones, common mistakes, and expert tips.
Why Bathroom Lighting Matters
A well-lit bathroom should achieve three things:
1. Functionality
You need bright, natural-looking light for shaving, makeup, grooming and cleaning.
2. Ambience
Soft, warm lighting can transform your bathroom into a relaxing retreat.
3. Safety
Bathrooms are wet areas with electrical rules, so lighting must meet NZ electrical safety standards (AS/NZS 3000).
Done right, bathroom lighting adds comfort, usability and long-term value.
The 3 Layers of Bathroom Lighting
A good bathroom lighting plan uses a combination of:
1. Ambient Lighting (General Light)
This is the main light source that illuminates the whole bathroom.
Examples:
-
Ceiling lights
-
LED downlights
-
Flush mounts
-
Skylights
Most NZ bathrooms rely on LED downlights for ambient lighting.
Ideal brightness: 1,500–4,000 lumens depending on size.
2. Task Lighting (Focused Light)
Task lighting is essential around the vanity and mirror.
Examples:
-
LED mirror lights
-
Vertical wall sconces
-
Backlit mirrors
-
Over-mirror lighting
Avoid placing downlights directly above the mirror — this casts shadows on your face.
Ideal brightness: 800–1,600 lumens near the vanity.
3. Accent Lighting (Mood or Feature Light)
These enhance ambience and highlight design features.
Examples:
-
LED strip lighting under vanities
-
Niche lighting in showers
-
Backlit mirrors
-
Wall sconces
-
In-wall uplighting
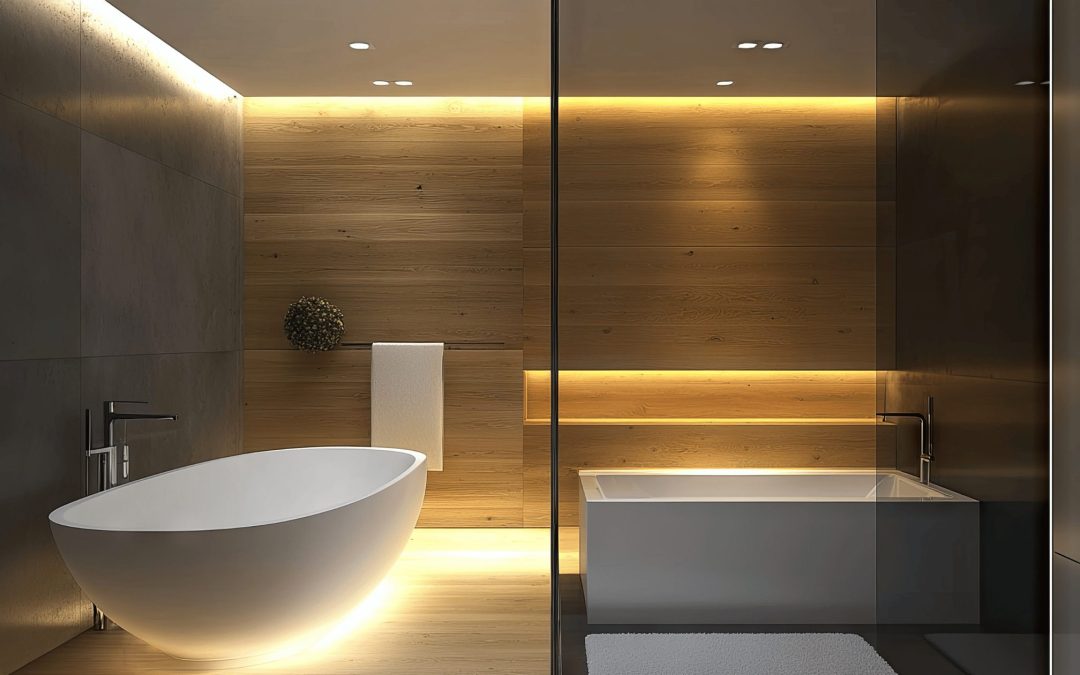
Accent lighting turns an ordinary bathroom into a spa-like space.
Bathroom Lighting Zones in NZ (What You MUST Follow)
Bathrooms are split into three electrical safety zones, and each has rules around what lights are allowed.
This is essential for NZ compliance.
Zone 0 – Inside the Bath or Shower
-
Zero tolerance for electrical fittings.
-
Only 12V IPX7 rated fixtures allowed.
-
Usually applies to niche lighting inside showers.
Zone 1 – Above the Shower or Bath
-
Requires IPX4 or higher fixtures.
-
Most NZ homeowners choose IP44+ rated downlights here.
Zone 2 – Around the Bath/Shower Perimeter
-
Minimum IPX4 rating.
-
Many vanity lights fall here.
Beyond Zone 2 – General Bathroom Area
-
Standard light fittings are okay.
-
Still recommended: IP44 for longevity in humid rooms.
Pro tip: Always consult a licensed NZ electrician — bathroom lighting is not DIY.
How to Create the Perfect Bathroom Lighting Plan
Follow these steps to design a bathroom that’s bright, practical and stylish.
1. Start with the Ceiling Layout
Most NZ bathrooms use LED downlights.
The rule of thumb:
-
Small bathrooms: 2–3 downlights
-
Medium bathrooms: 3–4 downlights
-
Large bathrooms: 4–6 downlights
Keep spacing even (typically 1.2–1.5 metres apart).
Avoid placing a downlight directly above the mirror — this creates harsh shadows.
2. Add Proper Vanity Lighting
Good vanity lighting is essential for grooming.
Best Options for NZ Bathrooms:
✓ Vertical LED lights on either side of the mirror
This eliminates shadows and provides flattering, even light.
✓ LED backlit mirrors
Modern, minimal and practical.
Great for small bathrooms or NZ homes wanting a contemporary look.
✓ Over-mirror bar lights
Simple and effective, but can cast shadows if too high.
Avoid:
-
Downlights directly above the vanity
-
Single-sided lighting
-
Warm yellow bulbs (poor colour accuracy)
3. Choose the Right Colour Temperature
This is where many homeowners go wrong.
Recommended colour temperature for NZ bathrooms:
3000K–4000K
-
3000K (Warm White) → Softer, relaxing, spa-like feels
-
4000K (Cool White) → Brighter, crisper, ideal for makeup & shaving
If you want flexibility, choose tunable white LED lighting.
4. Use Dimmers for Better Control
Dimmers instantly upgrade any bathroom.
Benefits:
-
Bright light for cleaning
-
Soft light for relaxing baths
-
Lower energy usage
-
Controls ambience
Make sure the fixtures are dimmable when purchasing.
5. Add Lighting in Key Functional Areas
Shower Lighting
Use IP44+ rated LED downlights.
Consider a second light if you have a large walk-in shower.
Bath Lighting
Soft accent lighting works well — especially LED strips around the bath edge.
Toilet Nook Lighting
A warm, soft LED strip or small downlight is ideal.
Best Types of Bathroom Lights for NZ Homes
Here are the most popular and practical choices:
LED Downlights
-
Energy efficient
-
Long lifespan
-
Ideal for ambient lighting
-
Available in IP rated options for wet areas
LED Mirror Lights / Backlit Mirrors
-
Provide perfect face lighting
-
Reduce shadows
-
Modern appearance
-
Popular in new builds and renovations
Vanity Wall Lights
-
Great for shadow-free illumination
-
Comes in vertical and horizontal styles
-
Works with most décor styles
LED Strip Lighting
Great for accent lighting:
-
Under vanities
-
Inside niches
-
Under shelves
-
Around mirrors
-
Ceiling coving
Choose IP65+ rated strips for wet zones.
Common Bathroom Lighting Mistakes (And How to Avoid Them)
Here are the pitfalls that regularly cost homeowners time and money:
Mistake 1: Using Only One Light Source
A single ceiling light = shadows + poor visibility.
Use layering instead: ambient + task + accent.
Mistake 2: Placing Lights Behind You at the Mirror
This creates face shadows.
Use side lights or backlit mirrors.
Mistake 3: Too Warm or Too Cool Lighting
Avoid yellow or blue tones.
Stick to 3000–4000K.
Mistake 4: Not Choosing IP-Rated Fittings
Moisture will damage non-rated lights.
Use IP44+ around showers and baths.
Mistake 5: No Dimmer Switches
Dimmers give you control over brightness for different tasks.
Mistake 6: Overlooking Natural Light
Add a skylight or larger window if possible.
This reduces energy usage and improves mood.
Bathroom Lighting Ideas for NZ Homes (2025 Trends)
Looking for inspiration?
Here are the top lighting trends Kiwi homeowners love:
1. Backlit Mirrors and Cabinets
Clean, modern and perfect for task lighting.
2. Floating Vanities with Underlighting
Creates a high-end, hotel-style look.
3. Shower Niche Lighting
Subtle LED strips turn a shower into a feature.
4. Black or Brushed Brass Light Fixtures
A modern, minimal aesthetic popular in new NZ builds.
5. LED Strip Ceiling Coving
Soft indirect lighting around ceilings — ideal for relaxing ambience.
6. Smart Bathroom Lighting
Bluetooth-dimmable or app-controlled LEDs are becoming more common.
How to Light Different Bathroom Sizes
Small Bathroom Lighting (NZ Apartments & Units)
-
2–3 LED downlights
-
Backlit mirror
-
Under-vanity LED strip
-
One dimmer switch
Medium Bathroom Lighting (Most NZ Homes)
-
3–4 downlights
-
Vertical vanity lighting
-
LED underlighting
-
Shower downlight
-
Optional niche lighting
Large Bathroom Lighting (High-End NZ Homes)
-
4–6 downlights
-
Feature pendants
-
Layered vanity lighting
-
Full 2700K–6500K tunable lighting
-
LED coving
-
Multiple dimmers
How Much Does Bathroom Lighting Cost in NZ?
Prices vary based on fitting type, quality and installation.
Here’s a rough breakdown:
| Lighting Type | Average NZ Cost (Installed) |
|---|---|
| LED downlights | $120–$250 per light |
| Vanity wall lights | $150–$400 each |
| Backlit mirrors | $300–$1,200 |
| LED strip lighting | $80–$250 per metre |
| Niche lighting | $150–$300 |
| Feature pendants | $200–$900 |
| Dimmers | $90–$160 each |
Prices vary by brand, style and electrical complexity.
Who Installs Bathroom Lighting in NZ?
Due to NZ electrical safety laws, bathroom lighting must be installed by a licensed electrician.
Plumbers like Extreme Plumbing NZ often coordinate:
-
Electricians
-
Tilers
-
Builders
-
Waterproofers
…to ensure the bathroom renovation runs smoothly.
Bathroom Lighting for Energy Efficiency
Modern LED lights can reduce your bathroom’s energy use by up to 85%.
For maximum efficiency, choose:
-
LED downlights
-
Dimmable fittings
-
Motion sensors for night lights
-
Solar-powered skylights
-
High CRI lights (better visibility with less energy)
Final Tips for Lighting Your Bathroom
Here’s what NZ experts recommend:
-
Combine lighting types, don’t rely on one source
-
Use side lighting around the mirror
-
Ensure all wet-area fittings are IP rated
-
Choose LEDs rated for NZ humidity
-
Use dimmers for flexibility
-
Plan your lighting before renovating, not after
-
Add accent lighting for a luxury feel
Conclusion: How to Light a Bathroom the Right Way
Bathroom lighting plays a huge role in creating a space that is bright, functional, safe and beautiful.
The best bathroom lighting plans in NZ include:
-
A layered lighting approach (ambient + task + accent)
-
Side lighting at the vanity
-
IP44+ rated fixtures in wet areas
-
A mix of downlights, mirror lights and LED strips
-
Colour temperatures between 3000K–4000K
-
Dimmers for mood and function
With the right planning and professional installation, your bathroom can look like a modern, spa-quality retreat.
Extreme Plumbing NZ works with homeowners across the North Shore and Auckland to deliver high-quality bathroom renovations, plumbing installations, hot water solutions and renovation coordination.
If you want expert advice or a renovation quote, we’re here to help.